Master Exposure: Tips & Tricks For Your Camera!
Are you struggling to capture the perfect shot, feeling frustrated by overexposed or underexposed images? Mastering your camera's exposure meter is the key to unlocking a world of photographic possibilities, allowing you to consistently create stunning, well-lit photographs.
It's a familiar experience, isn't it? You spend hours crafting the perfect composition, only to be disappointed by the final image. Perhaps the highlights are blown out, lacking detail, or the shadows are too dark, obscuring important elements. Understanding and utilizing your camera's exposure meter, also known as the exposure indicator, is the solution. The digital display, often a series of markings and numbers, translates light values into digital information that guides you in setting your camera's exposure correctly.
In today's world, where information flows freely, it's a powerful testament to the community that many photographers find more valuable information in comments sections and conversations than in the initial web content. Share your thoughts on the exposure meter and any tips that have helped you control exposure by leaving a comment below.
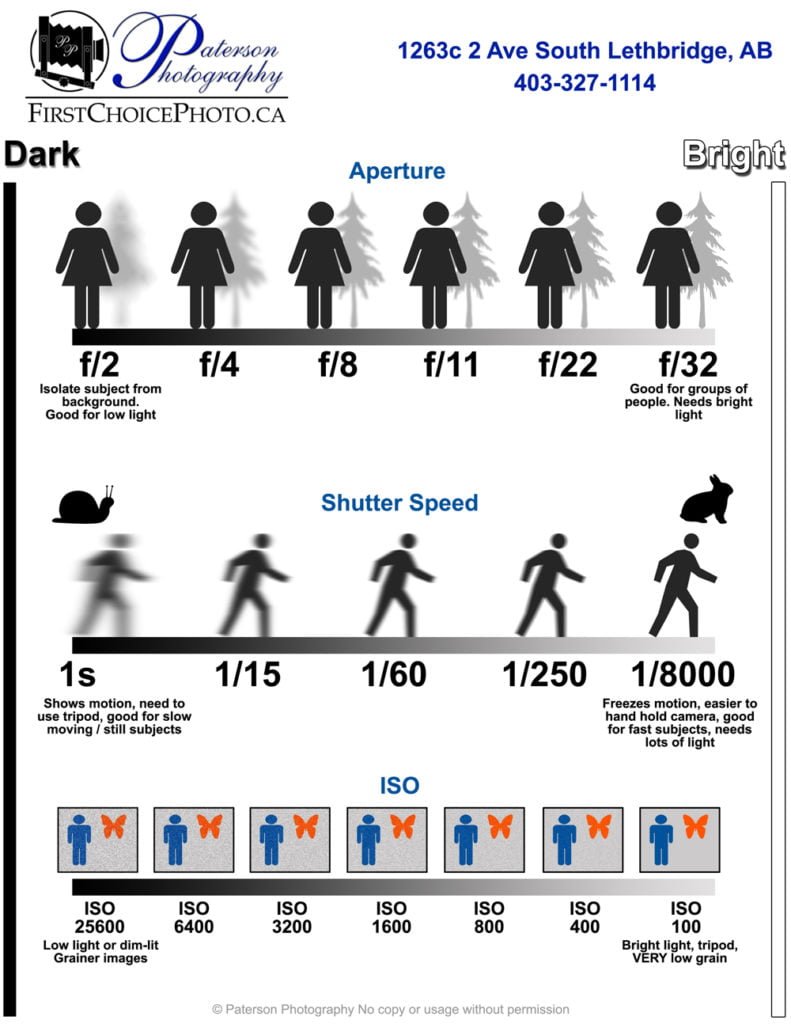
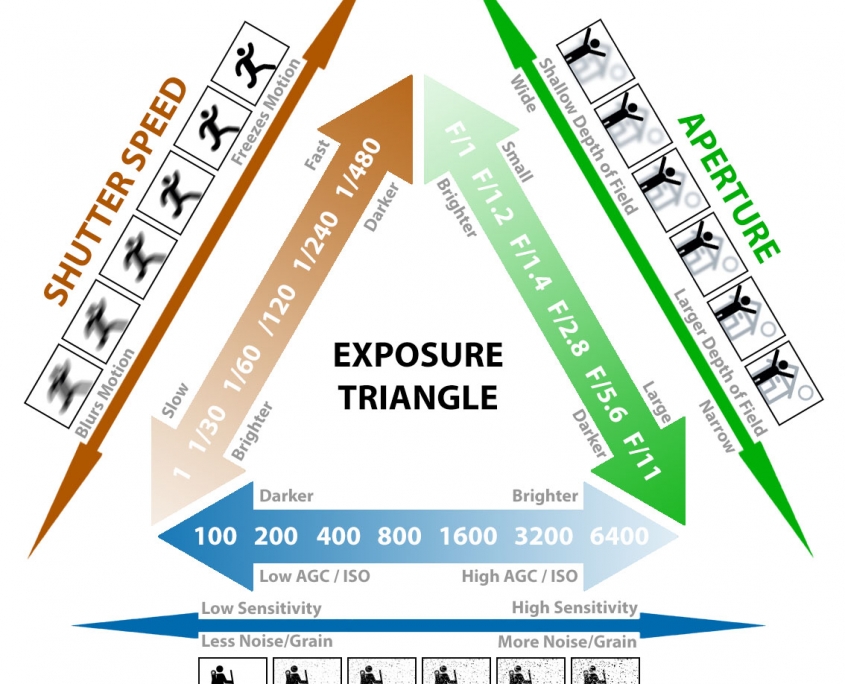
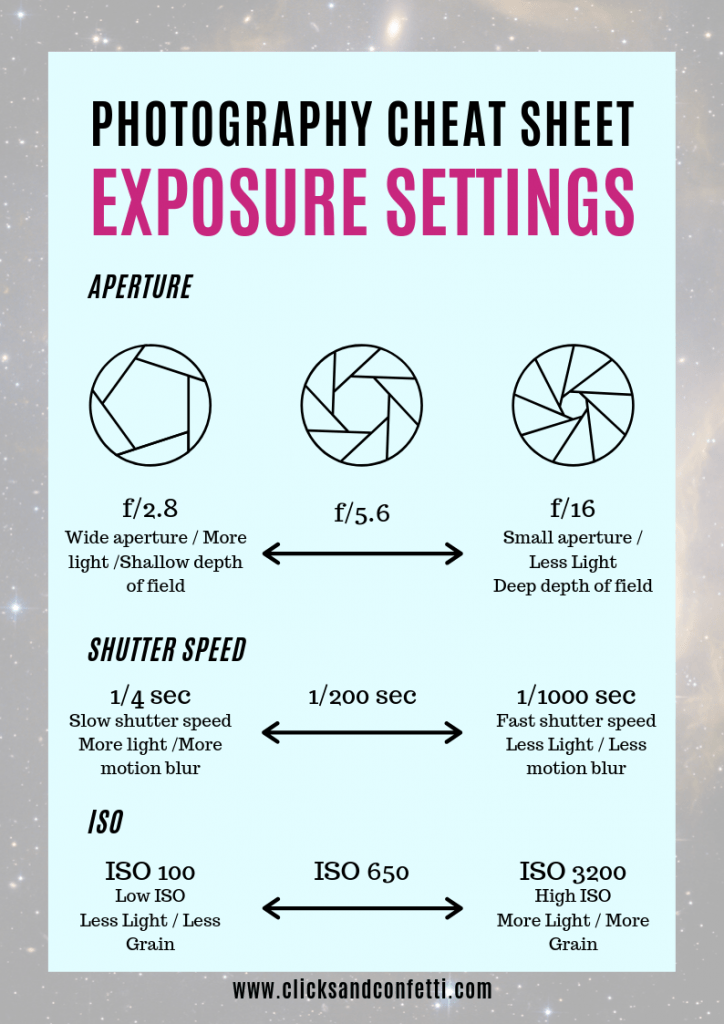
Understanding exposure is fundamental to photography. It refers to the amount of light that reaches the camera's sensor (or film). The interplay of aperture, shutter speed, and ISO, collectively known as the exposure triangle, determines the overall brightness or darkness of your image.
The exposure meter is built into every modern camera and provides a crucial guide for setting your camera's exposure correctly. Learning to interpret the exposure meter and make adjustments to your camera settings allows you to capture sharper photos and capture the details in challenging conditions.
For those venturing into the realm of digital photography, the ability to control exposure is very important. It is the key to capturing the best images.
Whether you are a beginner, intermediate, or professional photographer, mastering exposure is vital to the quality of your pictures. Every photographer must understand how the exposure works to capture the perfect shot. Changing the settings helps in taking the sharpest images and capture details.
To understand this concept fully, think of a disposable camera's function. In simple terms, exposure in the context of a disposable camera generally involves two main components. Both of these elements play a crucial role in determining how light impacts the.
Moreover, understanding how the exposure metering system on your DSLR camera can be fooled is also very important, such as when shooting in snow. Also, a few other factors need to be considered that may affect the exposure of your camera; for instance, the humidity level may affect image quality. In humid climates, moisture can lead to the growth of mold or fungus on your lens or camera sensor. Leaving the lens on for extended periods without proper ventilation can exacerbate this problem, affecting image quality.
Lets delve deeper into exposure by looking at the components: aperture, shutter speed, and ISO. Exposure is controlled using these three key settings. Changing these settings and making small adjustments to how your camera captures light can make a noticeable difference in image quality.
For those still learning, automatic mode is typically for your average consumer. While it is great for a start, to become an expert with your camera, always be in manual mode.
Furthermore, the exposure meter offers the possibility of adjusting exposure compensation, allowing you to tell your camera exactly how much lighter or darker you want the overall image to be compared to the cameras automatic meter reading.
The real secret to correct exposure with any DSLR camera. This can be achieved by guessing the exposure and checking it. My usual process now is to guess what the exposure is (im usually in the ballpark), chimp once, adjust, chimp again, good.
Changing camera settings lets you take sharper photos and capture details, even in challenging conditions. Even if the ISO setting is metadata, it affects your exposure decisions and thus the amount of light the sensor gets.
When working with cameras, there are a few things that should be taken into consideration, such as:
- Camera Permissions: Adjust the camera permissions for the website in your computer's browser settings.
- Webcam Tracking: Stop Microsoft Edge from tracking you on your webcam and microphone.
- Notifications: Enable notifications when using a webcam.
- Windows 11: Windows 11 will turn on the LED next to the camera when it is in use.
The histogram is also an excellent tool, as it provides empirical data that indicates potential loss of exposure detail due to clipping caused by the exposure settings.
Now, let's create a hypothetical profile for a well-known photographer to illustrate the significance of exposure in the field.
| Bio Data | Details |
|---|---|
| Full Name | Ansel Adams (Hypothetical) |
| Date of Birth | February 20, 1902 (Hypothetical) |
| Place of Birth | San Francisco, California (Hypothetical) |
| Nationality | American (Hypothetical) |
| Famous For | Black and White Landscape Photography (Hypothetical) |
| Career & Professional Information | Details |
|---|---|
| Profession | Photographer, Environmentalist, and Author (Hypothetical) |
| Known Works | "Moonrise, Hernandez, New Mexico", "The Tetons and the Snake River" (Hypothetical) |
| Style | Black and White, Landscape, High-Contrast (Hypothetical) |
| Techniques | Zone System, Precise Exposure and Development (Hypothetical) |
| Awards and Recognition | Presidential Medal of Freedom (Hypothetical) |
For additional information, consider visiting the official website for the Ansel Adams Gallery (Hypothetical): www.anseladams.com (Hypothetical)
The files can be read on to PCs (with a suitable card reader), and there is software that can be run that takes the data in text files on the PC and writes the exposure information into the EXIF section of scanned negatives. If youre about to start making your very first pinhole camera and are trying to plan it out, the following may be helpful.
I have a question around exposure times. My initial design uses a .2mm pinhole with a focal length of 30mm and an f-stop of about 150 for 35mm film. This seems to be pretty standard, and Ive seen a lot of cameras for sale that have this set up.
One thing to keep in mind is that even if the ISO setting is metadata, it affects your exposure decisions and, thus, the amount of light the sensor gets. Additionally, if you are using a dedicated camera, we recommend using the camera software offered by the camera manufacturer. For instance, Logitech offers its own software named Logitech Capture, which provides tens of settings to change the default camera settings.
Moreover, you can change camera settings via the settings app in Windows 10/11. The cameras processor calculates the optimal exposure settings based on the light meter reading, taking into account the cameras settings, such as the metering mode and exposure compensation.
Remember that your eyes are sensitive to too much exposure to bright light, and the sensor on your camera is as well. The sensor is one of the most important parts of your camera, so you want to be careful with it. If you take a quick picture of the sun, you wont damage your sensor, as long as you limit the exposure to a fraction of a second.
Ultimately, the journey of mastering exposure is a continuous one. But a good understanding of exposure will make the process fun, letting you push the limits and opening new possibilities to expand your creativity.
